[click the pictures to view a larger version]
Editing and Publishing
With the pages fully inked the last two steps left are to convert the pages into digital versions for editing and ‘publishing’ on the Web. Thanks to silicon technology and the Web, I am able to find readers for my comics throughout the world instead of only showing it to my cat since I don’t have any friends.
Scanning
The inked pages are scanned with my one year old Canon 3000Ex flatbed scanner at a resolution of 400dpi so that it’ll be easy to edit the artwork (the more pixels to manipulate the more accurate it’ll be) and also it’ll have a good enough resolution for printing on paper if I have the opportunity to do so one day. I’ve read that most pros scan their work at a higher 600dpi for commercial publication though.
Editing
The scanned pages are saved as Adobe Photoshop files and edited with the said software. First thing I’ll do is to adjust the Levels so that the line art will be pure black and everything else white in order to cut out the line art.
 Using Channels, I select every color channel and load them as a selection so that all the white spaces (background) between the line art are selected. I then delete the white background thus leaving the line art on its own layer. By doing this I can add tones on layers beneath that of the line art. Doing so will allow for easier adjustments to the tones and also for colors to be added later all without effecting the line art.
 Now comes the bulk of the editing job, zooming right into the pixels to clean the artwork from inking mistakes or dust from scanning. Cleaning takes up a lot of my time no thanks to my messy inking. Photoshop’s Polygonal Lasso tool is my (second) best friend because it makes it so much easier to edit the line art compared to the Eraser tool.

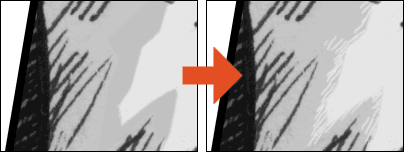 After clean up I insert the dialogue using fonts made for comics. Not much work involved here since all I have to do is type in the text based on the dialogue I wrote from earlier. Finally tones are applied to add body to the line art. The tones I use are basically just various levels of gray by using the Grayscale slider which are then painted on with the Brush tool. For some of the tones I erase the edges to give it an etched effect like with real tones you’ll see in real manga. With toning done I now have a sparkly new comic to show the world.
Publishing
In preparing for putting the comic up on the Web, I flatten the layers by selecting the Flatten Image function for each page and reduce the size of the resulting images to 20%. The images are then saved as JPEGs while keeping the file size down without losing too much quality. All there is left to do is to set up the webpages for each page, make sure the navigation from page to page are correct and FTP them into my website. If you don’t have your own website, you can sign up for a free webcomic hosting account at Smackjeeves
Promoting my comic and finding readers
To let readers around the world know that I’ve a new comic to entertain them, I submit my comic’s details to three excellent portals for webcomics:
There is still so much more learning to do
At this point in time I’ve only learned the basics in creating a comic from scratch to finding a small pool of readers for it. There are still tons to learn such as how to create a long series comic efficiently that is consistently updated on a fixed schedule, improve my artwork, inking and toning so that I can churn out pages faster, explore new story telling techniques such as pacing and paneling, improve on my writing hence better dialogue and much much more.
Read the previous parts:
How I'm learning to make comics: part 3
How I'm learning to make comics: part 2
How I'm learning to make comics: part 1